What has damp-proofing using membranes got to do with Dry Rot? Read on…
This article is about the use of vertical damp-proof membranes in buildings as a way of controlling damp. DPM’s have been used for years under floors and such, but recently they have really taken off for use above ground, just to stop persistent damp from becoming visible as stained and perished plaster.
I’m assuming that you don’t know much about these and haven’t much site experience using damp proof membranes so please bear with me.
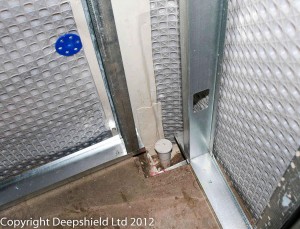
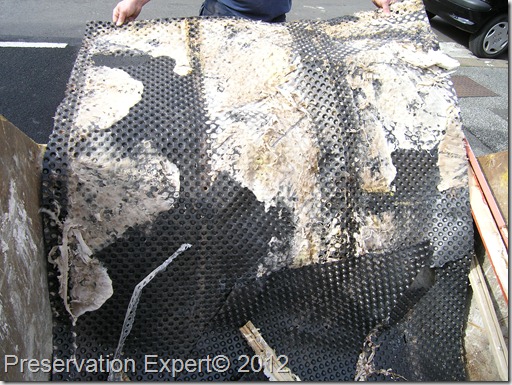
There are a wide range of damp proof membranes available for damp-proofing, but generically they are usually a dimpled plastic sheet which comes in a roll. The dimples look rather like the underside of a football boot and some call these membranes ‘egg box’ type. The studded side goes against the wall, leaving a small gap behind the membrane. This is essential below ground, so that water can flow. It’s redundant above ground, but may have a slight insulating benefit as it separates the bulk of the membrane from contact with the damp wall behind. Some say that this space is useful for ventilation; “to allow water vapour to escape” but in practice I’m not convinced this either happens or is useful anyway.
The membranes are fixed with self-sealing plugs so that any screw heads and such don’t rust. Though there are types which allow plaster to applied straight onto the membrane – no screws for laths needed.
They are an instant fix for the stubborn damp patch and offer some great advantages, especially for developers or investors who want to get a damp house to look dry and decorated in short order.
I buy many rolls of the stuff from my principle specialist suppliers (Safeguard Europe) and it’s great stuff. However, as a damp-proofing specialist I do consider all options when specifying a solution and I take into account site conditions. You must too, if you are tempted to buy this stuff on the Internet and use it yourself – it’s easy to cock it up and waste a tonne of money and time.
Anyway, the good points are:
- It’s quick
- It’s allows fast drying for decoration
- It will last a lifetime
- It will cover up just about any damp problem (OK so this is a good and a bad thing, depending on the situation).
So what are the catches?
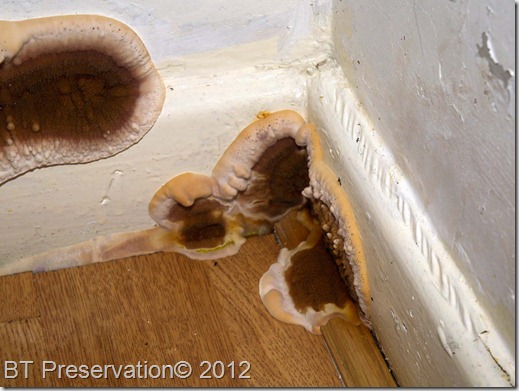
let’s start with the worst thing that can go wrong if you slap on some damp-proofing membrane…. This is Dry Rot Serpular lacrymans
The above is an image of True Dry Rot fruiting bodies, which appeared on the floor wall junction of a kitchen in Leeds, West Yorkshire. These were behind a fridge and were noticed when the lady of the house pulled it out for cleaning. A leeds based chartered building surveyor was called in and immediately recognised the fungus as Dry Rot. He knew me through Brick-Tie Preservation, so I ended up on site.
The house is a Victorian terrace with solid 9” walls. The house had a history of damp problems, but these were resolved five years earlier, when a local damp-proofing specialist was called in. His solution was to apply a membrane over the damp walls and fix laths and plasterboard on top – job done.
So, what went wrong?
The lady says that everything has been fine since the work was done; no plumbing leaks, no water spills and no floods – the house looked dry as a bone. Then shock-horror,” there are mushrooms everywhere”. The client called in the original damp-proofing specialist but no joy – the firm were bust and her guarantee was toast (No Guarantee protection Insurance as they were not Property Care Association members).
We started the work and found that the Dry Rot had attacked the laths which the plasterboards were fixed to. These are on the dry side of the membrane, in effect they are in the house and should be protected. The fungus extended for many meters, attacking the door frames, architraves, timber lintels above the kitchen door (an internal doorway through to the hallway), and the skirting boards.
It didn’t stop there though….
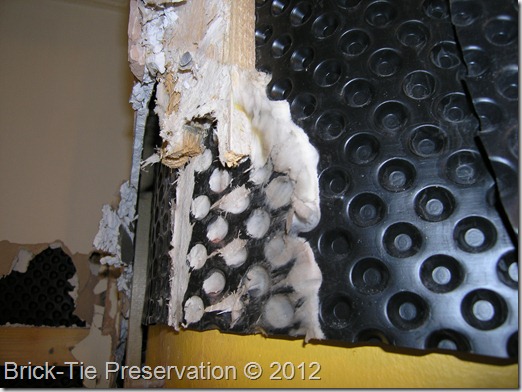
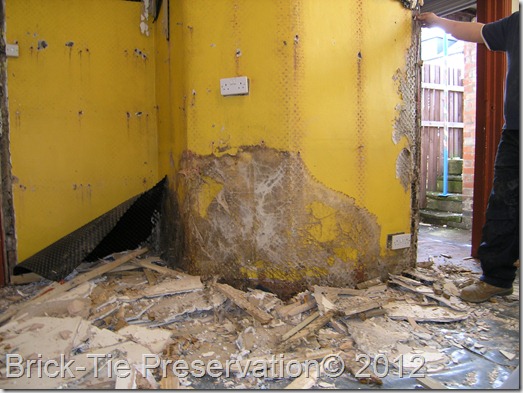
The above reveals the dry rot mycelium, extending up behind the membrane. Note that it also extends up the door frame and then on into the lintel above it. You can see that the original plaster is in place and the membrane has been applied directly to that. What you can’t see are the destroyed timber stair treads and risers on the other side of the wall, where the dry rot spread through into the stair string – the odd shape of the wall here, is separating the kitchen from a kite winded staircase.
So what happened to bring all this about?
It’s a tricky one this, because this is now quite a mature outbreak and finding the exact cause and initial point of germination, involves some deduction and a little educated guesswork.
Consider the evidence:
- The lady had a damp problem before – which is why the membrane ended up being used
- The outbreak is quite mature – otherwise we wouldn’t have all these fruiting bodies.
- It has grown on both faces of the membrane.
- It has been able to grow over quite a wide area.
Taking 1 & 2 into consideration, is it possible that the dry rot was already there, before the membrane was applied? That could be so; application of the membrane would tend to reduce evaporation from the masonry and improve conditions for growth. However, the original skirting board were removed by the original Leeds based damp-proofing company, so why wasn’t the rot seen then?
Whilst dry rot mycelium can grow over ‘sterile’ surfaces, like plastic membrane, it derives no sustenance from it and need energy from decay of timber to do this. If conditions are very dry, the mycelium gets desiccated and none of the fungus I saw was unhealthy – it was all very happy and thriving. Not surprising on the ‘wet’ side of the membrane,against the wall, but less common on the front ‘dry’ face (see below).
We’ll never know for certain and the damp-proofing company who did the work are no longer around to ask, but I think I have the answer…..
What we did find were a few remnants of rotted timber at the base of the wall, behind the membrane, which served as fixing plugs for the original skirting’s. These had been left in the brickwork and the new membrane applied over the top. The membrane also terminated at the door frame position, rather than being placed under it and the frame re-fixed on top. The stair string on the other side of the wall was not disturbed either. In addition, the lintel over the door was original and was encapsulated behind the membrane. These suggest that the dry rot outbreak happened because timber was in effect, wrapped in plastic, so it’s equilibrium moisture content, with that of the damp masonry was raised, so dry rot started.
However, if anything, there was more dry rot on the front face of the membrane, behind the plaster board. The decay in the laths was active and thriving, so clearly the moisture content of the timber laths was high enough for the fungus to thrive. Why?
Remember that all these membranes are vapour proof – that works both ways – vapour cannot escape the wall and cannot pass into the wall from the living space. In damp weather the walls may become quite wet but really, that doesn’t matter, as long as there is no timber behind the membrane for dry rot to attack. What about the inside face? The plasterboard with the small air space behind it provides some insulation value on it’s own; more so, when insulation is fixed in front of the membrane. Vapour exerts a pressure and will pass through the plasterboard and into the void behind it. The lower temperature here, especially at the surface of the membrane will drive up the Relative Humidity and that in turn will allow the timber, exposed to that environment to reach a higher equilibrium moisture content – so it is quite possible that the dry rot actually started in the timber laths, or on the back of the new skirting or original door frames, simply due to this.
Moving on, lets look at less damaging but equally avoidable problems.
Here’s a short video I made on a pre purchase damp and timber survey in Otley, North Yorkshire.
Self explanatory really, but it is a problem I am seeing more and more, due to lazy specification by damp-proofing ‘specialists’ and ignorant application by homeowners and builders, buying this stuff on the Internet and just not being properly informed.
These are a few tips for avoiding problems using membranes to control damp above ground.
- Never leave any timber behind the membrane; not even tiny old fixing plugs and certainly not lintels and wall plates – these will almost inevitably rot as moisture content increases.
- Don’t just stop the membrane next to wood near the damp problem, as this too will end up against a damper surface – take it off and re-fix on top of the membrane
- Always extend the membrane well past the damp area – to the ceiling when dealing with rising damp problems and well past either side.
- Take account of vapour in the house – it may increase merely by the fact that a membrane has been applied; especially if a large area is covered. Install a vapour check in front of the membrane, either with foil backed plasterboard or foil finished insulation – on the warm side of the insulation.
- If using timber laths to fix the plaster boards on to – consider pre-treatment with a timber preservative.
- Make sure the living space is well ventilated with extraction in the kitchen and bathroom as a minimum. In ‘back-to-backs’ or other hard to ventilate houses, consider a positive input ventilation system.
Don’t be put off by the above – membranes have their place and I specify them all the time. A bit of thought beforehand is well worth it though.
Lot’s of the above applies to use of membranes below ground too, but remember that in that environment they are known as Cavity Drain Membranes and as the name implies, they must have drainage included, to divert water ingress away – this use is full of even more pitfalls and is not something I’d recommend for any self-builder or DIY enthusiast – try specialists from the PCA or my Basement waterproofing firm; for the North of England.
best regards
Dry Rot.
This a great article. Dump and condensation are huge problems and not many people are realizing it when refurnishing old properties. I am just about to refurbish a flat within a listed building and insulation of a old walls is my main concern. I am learning as I am going but this article is just about what I was looking for as I was thinking to use a ‘egg box’ membrane too. Hope I will get it right 🙂 Thank you Dry Rot
Great website this, I have an interesting one. Damaged plaster removed off 9 inch externally brick wall in kitchen. Dpc used with dry rods, job done its seems, my issue is that the brick baseline is wet, damp, this will in effect be covered over with skirting. What can I do then about this baseline damp? I know it won’t spread up the wall now, but what I don’t want to do is block the base brick from breathing to release this trapped moisture, its wet through when raining.
I’m wondering what are my options then?
I can’t lower the concrete path outside my house to run beneath this baseline, and there’s no point raising the floor above the baseline, I’m concerned about the structure of the property being wet at the baseline more than anything. I guess as its a Victorian house it’s the norm, and ventilation is the only answer here, but how to ventilate if the baseline will be covered by skirting?
Thanks Martin
Thanks Martin,
A 9″ wall will dry out to the external face and I wouldn’t worry too much about covering the internal face at low level with skirting. When a wall has been damp you need to treat the skirting with a good preservative to give protection whilst the wall dries. However, it should dry out fine, especially as you have installed dryrods.
An upstairs bedroom has black mould, the outside brickwork is covered by render. If I am to tackle the problem should I remove the outside render? I am concerned by just putting a plastic membrane inside will not solve the damp, cold wall as i have read victorian walls need to breathe and need lime cement pointing.I am having the roof looked at to fix any tiles that may have led to the problem as the ceiling also has a cold damp issue with paint blistering in an area.
I am a complete novice and I only gained knowledge through googling.
Hi Collette,
If you are having mould problems then excess humidity is the likely cause. If the wall has a cement render, which is in good condition, then removing that will achieve very little. Make sure you have excellent extraction in the kitchen and bathroom. If you do, then is that room well heated? You don’t need to apply any membrane on the iside if the issue is only condensation.
Bryan.
Hi Bryan,
I love your work here, and how you break down your thinking and discoveries.
Many thanks for sharing
Tanya
Thank you Tanya,
I don’t post anything like as much as I used to but when I get encouragement I tend to post again so…. watch this space!
Bryan