Now that you have read part 1 and part 2, we can move onto more problematical damp. This is rising damp. Despite what some daft journalists and conservationists say, it’s very common. However, it is also often misdiagnosed and I’d say that quite a few expensive damp courses are installed when they needn’t be (I saved a client the cost and disruption of this only last week in Wakefield, where a ‘specialist’ recommended by an estate agent wanted to do a bucket-load of DPC work, when there was a perfectly sound bitumen damp course installed and working, except for a couple of small external defects, which were cheap to fix).
This is the basic guide to rising damp, so we are not talking capillarity, surface tension in pores, hygroscopicity or any of that jargon – forget it; let’s concentrate on what rising damp may look like to you and me. What it can do and how to be rid of it.
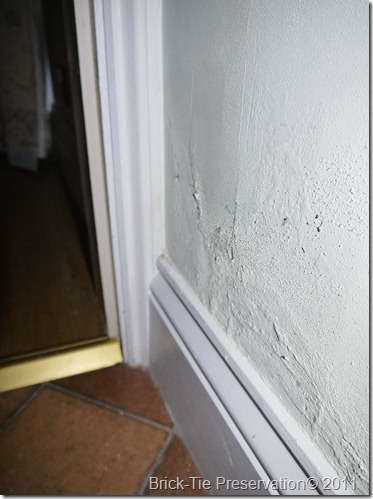
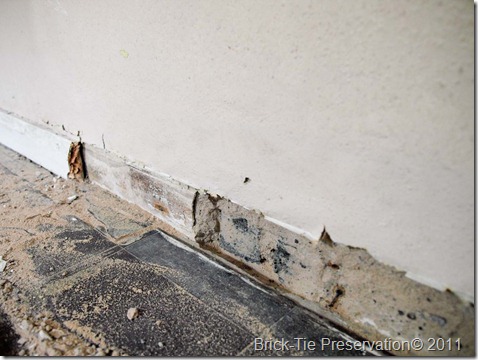
I’ve included a few images of the sorts of problems at the base of walls, which may be described as rising damp. Not all of these cases require a chemical damp course, though some do. They all have moisture rising up the base of the wall. The moisture may, as you see, cause staining, salting, flaky plaster and even breakdown of the wall surfaces – inside and out. It doesn’t make the plaster feel wet to the touch.
Masonry, whether brick or stone is porous (flint and such isn’t really but I’m on about the common stuff). Wet it and the moisture will be absorbed into the spaces in the material and in a wall it can be ‘sucked’ up the structure, like a wick in oil.
Sometimes no work is needed, but in cases where it is either damaging the wall or plaster, or disrupting decorations (as above); action is essential. It can also cause wooden floors in ground floor rooms to rot, as may the skirting boards and door frames fixed to the damp walls. You cannot smell rising damp, though you may smell rot caused by it.
Now then; the base of a wall, say along its length, is damp. How can we tell if it isn’t condensation or damp coming through the wall? Easy, look at part 1 and 2 on this site. Check them first. If there is no mould and none of the defects which suggest otherwise then we are left with Rising damp as a possibility – it needs careful consideration to avoid unnecessary expense in treating it.
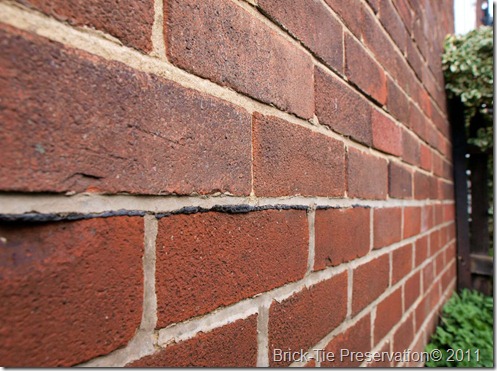
First, as always the obvious. Is there a damp course already installed by the builder or since construction? It would be good to know what these look like. The most common is a bitumen physical damp-proof course (DPC from now on). This is sometimes a hessian strip soaked in bitumen and laid on the brickwork, so that what you see is a black line in-between the bricks; horizontally near the ground. It should really be at least 150mm above the ground. Have a look. It may a poured bitumen type, in which case you may see some vertical run-marks, where the bitumen trickled down the face of the brick, below the DPC level.
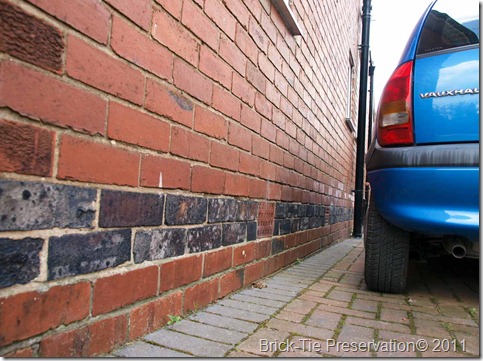
It may be slate, laid along a bed-joint between the bricks in the same position. There may be courses of dense brick, usually blue in shade, designed to stop damp rising because they have fewer pores for the water to ’wick-up’. These are not very reliable; experience and studies show that most damp, though not all, rises up through the mortar around the bricks and stones, rather than through them.
It matters if there is a proper DPC already installed because, rising damp in walls with a DPC already in, rarely need another DPC installing (as always there are exceptions). So, if there is a DPC in, look for other reasons why the damp is rising up the wall before considering a specialist treatment.
let’s take a house with a DPC installed, which nevertheless, seems to have rising damp.
How could this happen? For a start, the DPC will not work properly if damp in the ground can bypass it. This is known as bridging (sorry about the jargon – the damp uses something as a ‘bridge’ to bypass the DPC).
The DPC works, not by blocking damp sloshing up against it, but by presenting a barrier to the masonry above it. The wall can’t ‘wick-up’ damp, if it is not resting on the damp ground, where the moisture is. So follow that DPC around the house – outside first. Is there anything which could allow the wall above the DPC to draw moisture from below – is there any bridging?
The most common problem is the ground, which may have been below the DPC when the house was built, but which has been raised over the life of the house. Driveways laid on existing driveways; patio flags on top of flags and asphalt on concrete – the list goes on. If the DPC is underground that will stop it working. The remedy is lower the ground – simple.
Okay, maybe not simple, if the ground is a public path or there are, for some reason, services like gas or electric in the way. lowing the path is the best and usually most effective thing to do.
A less severe problem is partial bridging. This is usually by external render, applied over the DPC, so that some damp is drawn up the render; bypassing the DPC. In practice I’ve found this is not a big problem, because most render is hard cement and damp doesn’t rise up hard cement very well. However, the base of all walls get splashed with rainwater all the time and hard render at the base can trap water in, adding to the bridging and causing damp, which looks like rising damp – but isn’t.
Inside now. The walls are plastered and the base of the wall has skirting board fixed to it. Is the floor concrete? If so, it may be a good idea to remove a skirting board from the damp wall. If the plaster continues behind the skirting and touches the concrete floor, this too can cause a partial bridging problem. There isn’t the rainwater splash issue to compound it, so usually the damp caused by internal plaster bridging doesn’t rise so high. If the rising damp is high up the wall – say over 500mm then simple plaster bridging is unlikely to be the cause.
If external render or internal plaster is bridging the DPC, simply cut it back until the DPC can be seen. Internally, this gap will be hidden by the skirting board when you put it back. If there’s a thin strip of moist brickwork behind the skirting, consider sealing this with a damp resistant paint like DryBase – this will protect the back and bottom edge of the skirting board.
Externally, some tarting-up may be needed, with a bead on the bottom of the render and some localised re-pointing, where the brick or stone is exposed. If rainwater splash has played a part and you can’t lower the ground much, consider StormDry application to the naked render, brick or stone so it still breaths, but doesn’t let so much rain through (naked render means unpainted – uncoated only), however you must never apply a water repellent below DPC level as this could cause spalling (shelling of the brick or stone face), if the substrate stays saturated.
Checking for a bridging problem is harder when the wall is a cavity wall, with two separate skins of brick or stone. In these case the problem may be inside the cavity – the bridge could be mortar droppings left by the bricklayer or rubble, carelessly dropped down there by the builder or a window fitter or even gas and ventilation contractors (see part 2 for some stuff on this).
Bridging by cavity blockages at the base of walls are usually easy to spot; if you are experienced. Homeowners can’t really check for this so a specialist like me, with a fibre-optic like a boroscope or a infrared thermometer and moisture meter can help locate the problems. Boroscopes are no good if the cavity has been insulated with foam or blown-fibre, so Infrared cameras may help, at the right time of year and in trained hands.
The same checks for bridging should apply to houses, even when you haven’t located a DPC. This is because things like high path levels, render touching the floor and such encourage rising damp in walls without a DPC and sometimes, attending to these problems will help control the problem. It may be that the wall has resisted rising damp fairly well in the past, even without a DPC. Later in the life of the wall, the situation can be changed, by addition of render or raising ground level. So it is good practice to sort out any bridging issues.
Still, there are times when the rising damp is a nuisance and nothing you read in part 1 or part 2 or above is helpful.
Time for a specialist to get involved. A specialist means someone who is qualified and experienced and insured to specify. In effect that means a member of the Property Care Association. This could be a contractor member (like me; have a look at my yorkshire based damp-proofing business by searching for Brick-Tie Preservation), or one of the many independent consultant members (see PCA web site). If not a specialist, then an independent Chartered building surveyor or building engineer, with additional experience in damp diagnosis could be considered, there are some excellent ones, but they are hard to find because their institutes don’t differentiate these from general surveyors with less knowledge of damp.
Finally, where a wall has been subject to rising damp for many years, minerals, which are in the ground will have been deposited in the wall and plaster. These ‘salts’ are similar to kitchen salts in that they readily soak up water vapour from the air. We’ve all seen peppercorns in salt pots to try to keep the salt from ‘clagging’? Once the bridging problem is removed or a new DPC installed, these salts remain and can adsorb enough moisture to keep the wall damp. Re-plastering with salt resistant render or a specialist dry-lining method will be needed.
Remember – there is no credible method of controlling rising damp, which doesn’t need to remove the salts; don’t be conned by the “no need to plaster” brigade, they are telling you what you want to hear so that they can get your cash; they know the walls will remain damp, but they also know you won’t be able to prove it and they’ll get to keep your money, even if you take them to court.
I’ll post something on the type of remedial damp courses available to control rising damp later. I hope the guides help you.
Dry Rot
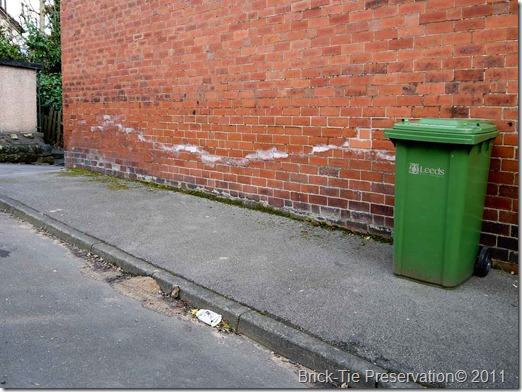
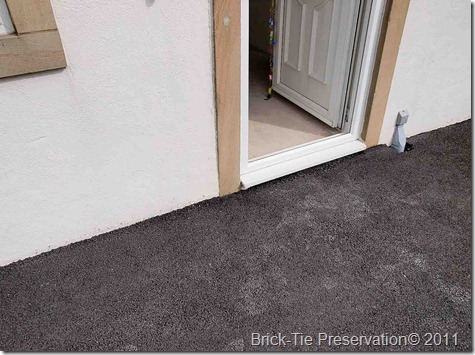
In the top photograph in this post (the brick wall and the green bin) what was the source of the dampness?
Regards
George
Hi George,
Thanks for looking in. The image is just a good example of a nice salt band. Moisture is certanly rising up the wall along it’s length. I didn’t survey this house; I was surveying one on the opposite side of the road, so I can’t give a definative answer just from outside.
However, knowing this street well I’d say that this is moisture from soil rising via the high path level, bridging the bitumen DPC. The path is a public right of way so the damage was done by people who ought to know better.
Thank you David,
There is no problem with the DPC being visible. There is no need to point over it – in fact it will work better exposed. Make sure that nothing is allowed to cover it, such as soil or paving as this would bridge it and cause damp.
Best regards
Bryan